We're back! More info here:
http://coolpinewoodderbycars.blogspot.com/2011/04/home.html
Tuesday, November 26, 2013


Thursday, February 9, 2012
Pinewood Derby Car Tips and Tricks
Graphite and weights are always good to use.
Always remember to put the weights in the back, for propulsion down the track.
If a car is too heavy, drill holes in the bottom that won't be visible on the car.
Always remember aerodynamics when making a car (drag, force, etc.).
Paint almost always looks better with a second coat.
Polyurethane gloss is how the pros get their cars shiny. It's cheap, and can be used year after year.
The more you sand, generally, the smoother your car will be.
Rounding the little stub that comes on the rim on the wheels with sandpaper is legal, and can make your car go faster if you don't cut off too much.
Hot glue works better than super glue when holding weights in.
Sinkers are a good, cheap alternative to car weights, although be sure to wash your hands after handling them. Most contain lead, while car weights are lead-free.
Mixing colors may be the only way to get the one you want.
Always remember to put the weights in the back, for propulsion down the track.
If a car is too heavy, drill holes in the bottom that won't be visible on the car.
Always remember aerodynamics when making a car (drag, force, etc.).
Paint almost always looks better with a second coat.
Polyurethane gloss is how the pros get their cars shiny. It's cheap, and can be used year after year.
The more you sand, generally, the smoother your car will be.
Rounding the little stub that comes on the rim on the wheels with sandpaper is legal, and can make your car go faster if you don't cut off too much.
Hot glue works better than super glue when holding weights in.
Sinkers are a good, cheap alternative to car weights, although be sure to wash your hands after handling them. Most contain lead, while car weights are lead-free.
Mixing colors may be the only way to get the one you want.
2011 Monster Mutt Truck
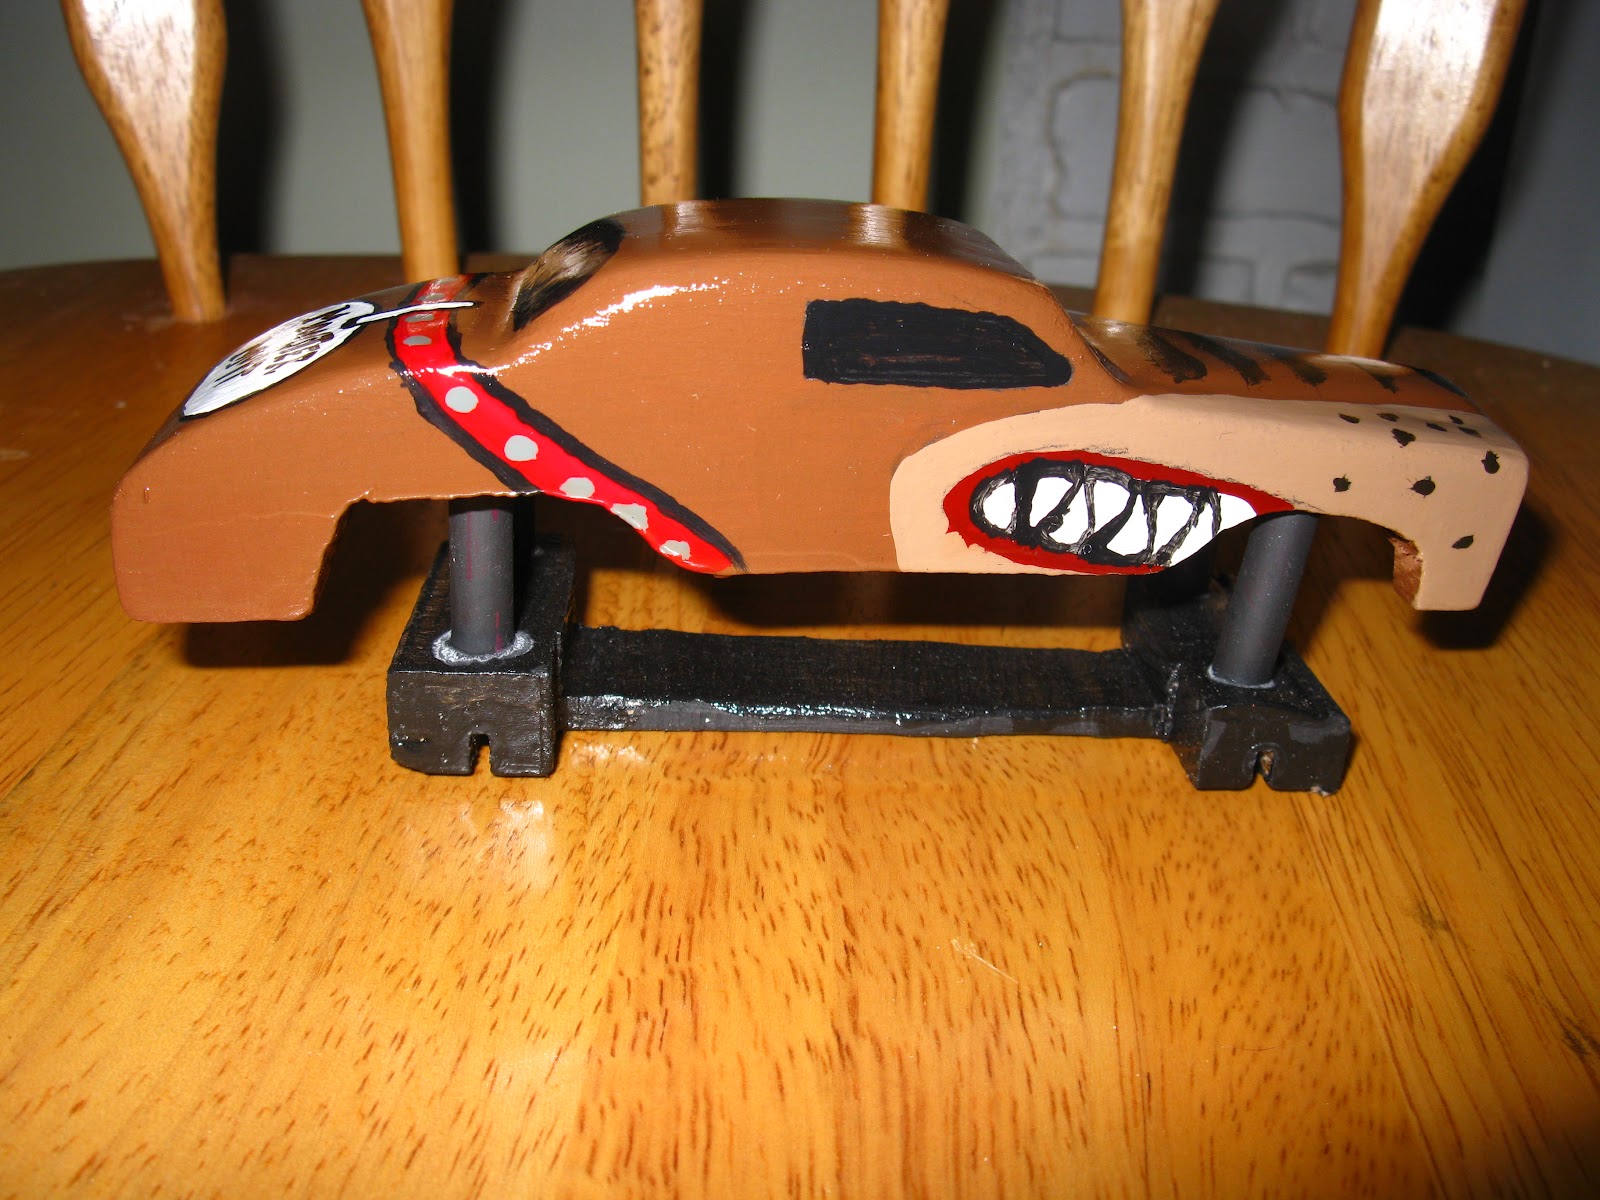


What you need:
1 standard pinewood derby kit
Dark brown felt
Light brown paint
White paint
Dark brown paint
Black paint
Red paint
Wood polyurethane gloss
60 grit sand paper
150 grit sandpaper
Saw of some kind
2 pencils
A thin block of wood, the same size as the derby car, in area
Super glue or hot glue gun
Painters tape (optional)
Weights (optional)
Drill (optional)
Graphite (optional)
How I made it:
Step 1. Cut the block to the proper dimensions for a basic shape of the truck, rounding the top.
Step 2. Carefully cut off the bottom part of the car, making fenders while having 2 pieces of wood. Save the spare piece.
Step 3. Sand the entire car with 60-grit sandpaper.
Step 4.Take the spare piece of wood and cut it to the dimensions of the bottom frame, as shown in the picture.
Step 5. Cut the pencils into 4 separate pieces, all the same length, so it would make the car higher but below the height restriction, as shown in the picture.
Step 6. Hot glue or super glue the pencils as shown in the picture to connect the 2 frames, as the "lift" of this truck.
Step 7. After all of the glue is dry, paint the top with a dark brown base, and paint the bottom with a black base. Repeat this step after the paint dries.
Step 8. Give the car a light sanding with 150 grit sandpaper.
Step 9. After the second coat is dry, paint on all of the designs. At this point, it would help to have a picture of Monster Mutt.
Step 10. After the details are painted and do not need another coat, paint a thin coat of polyurethane gloss on the entire car.
Step 11. After the first coat is dry, give the entire car a second coat of polyurethane gloss. Let it dry overnight.
Step 12. After the gloss is dry, cut the felt into ears and glue them on the car, as shown in the picture.
Step 13. Attach the wheels to the axles and then glue the axles to the axle holes. Let the glue dry.
Step 14. Add weights and/or graphite to the car. (optional)
Step 15. Cut a small piece of wood, paint it red, and glue it where the tongue goes.
Step 16. Race your car when it is dry.
Wednesday, November 16, 2011
2010 Milky Way Car
2010 Milky Way Car
Awards:


What you need:
1 standard pinewood derby kit
Brown paint
White paint
Green Paint (or if you're not the painting type, a Milky Way label should have the same effect)
Wood polyurethane gloss
60 grit sand paper
150 grit sandpaper
Saw of some kind
Glue (for axles)
Weights (optional)
Drill (optional)
Graphite (optional)
How I made it:

Step 1. Cut off the four triangles in the corners of your block, as viewed from the side, as this diagram illustrates.
Step 2. Give a good sanding with 60 grit sandpaper all over the car. Finish off with a light 150-grit sanding.
Step 3. After you have sanded it, give the car 1 coat of brown paint on the whole car.
Step 4. Give the car a second coat of paint when the first coat dries, painting the same area you did in step 3.
Step 5. After all of the paint is dry, give the entire car one coat of polyurethane gloss. Let it dry for at least 2 hours.
Step 6. Give the car a light sanding with 150 grit sandpaper.
Step 7. After the first coat is dry, give the entire car a second coat of polyurethane gloss. Let it dry for at least 2 hours.
Step 8. Give the car a light sanding with 150 grit sandpaper.
Step 9. After the second coat is dry, give the entire car a third coat of polyurethane gloss. Let it dry overnight.
Step 10. After the gloss is dry, place or paint the Milky Way label on the front like a real Milky Way Bar.
Step 11. Attach the wheels to the axles and then glue the axles to the axle holes. Let the glue dry.
Step 12. Add weights and/or graphite to the car. (optional)
Step 13. Race your car when it is dry.
Awards:
2nd For Speed
Top left: This car is very aerodynamic thanks to it's "wedge" shape, which is based off an actual candy bar.
Bottom left: We're surprised it's classic candy bar design didn't win us anything in the design department.


What you need:
1 standard pinewood derby kit
Brown paint
White paint
Green Paint (or if you're not the painting type, a Milky Way label should have the same effect)
Wood polyurethane gloss
60 grit sand paper
150 grit sandpaper
Saw of some kind
Glue (for axles)
Weights (optional)
Drill (optional)
Graphite (optional)
How I made it:

Step 1. Cut off the four triangles in the corners of your block, as viewed from the side, as this diagram illustrates.
Step 2. Give a good sanding with 60 grit sandpaper all over the car. Finish off with a light 150-grit sanding.
Step 3. After you have sanded it, give the car 1 coat of brown paint on the whole car.
Step 4. Give the car a second coat of paint when the first coat dries, painting the same area you did in step 3.
Step 5. After all of the paint is dry, give the entire car one coat of polyurethane gloss. Let it dry for at least 2 hours.
Step 6. Give the car a light sanding with 150 grit sandpaper.
Step 7. After the first coat is dry, give the entire car a second coat of polyurethane gloss. Let it dry for at least 2 hours.
Step 8. Give the car a light sanding with 150 grit sandpaper.
Step 9. After the second coat is dry, give the entire car a third coat of polyurethane gloss. Let it dry overnight.
Step 10. After the gloss is dry, place or paint the Milky Way label on the front like a real Milky Way Bar.
Step 11. Attach the wheels to the axles and then glue the axles to the axle holes. Let the glue dry.
Step 12. Add weights and/or graphite to the car. (optional)
Step 13. Race your car when it is dry.
Saturday, April 30, 2011
Home
Welcome to my website, coolpinewoodderbycars.blogspot.com! Here you can find very cool pinewood derby car ideas, and instructions to make them.
~~~~~~~~~~~~~~~~~~~~~~~~~~~~~~~
Update, November 26, 2013:
I'm back! After Thanksgiving, I will start posting more car ideas and instructions from previous years/races we have done. I may also overhaul the look and layout of the website to make it easier to use.
So, where was I? Well, I didn't post anything for nearly 2 years as I sorta forgot about this blog, and I wasn't able to enter the local pinewood derby races as they were closed due to lack of funding. But a few things have encouraged me to come back: I found some of my older pinewood cars and am (after Thanksgiving) no longer super busy. I was also encouraged by the fact that this blog is still popular, and during the 2 years that I didn't post anything, I still got 1,500 unique visitors.
I also plan on posting plans, ideas, tips, and news articles at least once a week, maybe more often if the demand is there :)
And, if you're reading this, thanks for visiting! Have a happy Thanksgiving and keep on pinewood-derby-ing :D
-Mike
~~~~~~~~~~~~~~~~~~~~~~~~~~~~~~~
~~~~~~~~~~~~~~~~~~~~~~~~~~~~~~~
Update, November 26, 2013:
I'm back! After Thanksgiving, I will start posting more car ideas and instructions from previous years/races we have done. I may also overhaul the look and layout of the website to make it easier to use.
So, where was I? Well, I didn't post anything for nearly 2 years as I sorta forgot about this blog, and I wasn't able to enter the local pinewood derby races as they were closed due to lack of funding. But a few things have encouraged me to come back: I found some of my older pinewood cars and am (after Thanksgiving) no longer super busy. I was also encouraged by the fact that this blog is still popular, and during the 2 years that I didn't post anything, I still got 1,500 unique visitors.
I also plan on posting plans, ideas, tips, and news articles at least once a week, maybe more often if the demand is there :)
And, if you're reading this, thanks for visiting! Have a happy Thanksgiving and keep on pinewood-derby-ing :D
-Mike
~~~~~~~~~~~~~~~~~~~~~~~~~~~~~~~
Friday, April 29, 2011
2011 Steak Sauce Car
2011 Steak Sauce Car
Awards:
Won 2nd for design
 Top left: My 2011 Steak Sauce Car. It was relatively easy to cut because the standard block of wood is similar in proportion to a real steak sauce bottle.
 Bottom left: On the left in the picture is a real steak sauce bottle, on the right is my car. I used an online sticker for the label.
What you need:
1 standard pinewood derby kit
Reddish-brown paint
White paint
Steak sauce sticker printed online
Wood polyurethane gloss
60 grit sand paper
150 grit sandpaper
Saw of some kind
Super glue or hot glue gun
Painters tape (optional)
Weights (optional)
Drill (optional)
Graphite (optional)
How I made it:
Step 1. Cut the block to the proper dimensions for the steak sauce bottle, not rounding the top but leaving it square (unless you really want it round right away). You may have to cut out an axle hole, if you have to than you will have to remake an axle hole further back on the car.
Step 2. Sand the top of the steak sauce bottle by wrapping the 60 grit sandpaper around the top of the car back and forth until it is as round as you want (it may take a while). Then give a light sanding with 60 grit sandpaper on the rest of the car.
Step 3. After you have sanded it, give the car 1 coat of reddish-brown paint on the whole car except for a little bit of room on top for the cap (you can use painters tape to block off the top).
Step 4. Give the car a second coat of paint when the first coat dries, painting the same area you did in step 3.
Step 5. Give the cap of the steak sauce car a coat of white paint(you can now remove the painters tape).
Step 6. Give the cap a second coat of paint when the first coat dries, painting the same area you did in step 5.
Step 7. After all of the paint is dry, give the entire car one coat of polyurethane gloss. Let it dry for at least 2 hours.
Step 8. Give the car a light sanding with 150 grit sandpaper.
Step 9. After the first coat is dry, give the entire car a second coat of polyurethane gloss. Let it dry for at least 2 hours.
Step 10. Give the car a light sanding with 150 grit sandpaper.
Step 11. After the second coat is dry, give the entire car a third coat of polyurethane gloss. Let it dry overnight.
Step 12. After the gloss is dry, place the sticker on the front like a real steak sauce bottle.
Step 13. Attach the wheels to the axles and then glue the axles to the axle holes. Let the glue dry.
Step 14. Add weights and/or graphite to the car. (optional)
Step 15. Race your car when it is dry.
Awards:
Won 2nd for design


What you need:
1 standard pinewood derby kit
Reddish-brown paint
White paint
Steak sauce sticker printed online
Wood polyurethane gloss
60 grit sand paper
150 grit sandpaper
Saw of some kind
Super glue or hot glue gun
Painters tape (optional)
Weights (optional)
Drill (optional)
Graphite (optional)
How I made it:
Step 1. Cut the block to the proper dimensions for the steak sauce bottle, not rounding the top but leaving it square (unless you really want it round right away). You may have to cut out an axle hole, if you have to than you will have to remake an axle hole further back on the car.
Step 2. Sand the top of the steak sauce bottle by wrapping the 60 grit sandpaper around the top of the car back and forth until it is as round as you want (it may take a while). Then give a light sanding with 60 grit sandpaper on the rest of the car.
Step 3. After you have sanded it, give the car 1 coat of reddish-brown paint on the whole car except for a little bit of room on top for the cap (you can use painters tape to block off the top).
Step 4. Give the car a second coat of paint when the first coat dries, painting the same area you did in step 3.
Step 5. Give the cap of the steak sauce car a coat of white paint(you can now remove the painters tape).
Step 6. Give the cap a second coat of paint when the first coat dries, painting the same area you did in step 5.
Step 7. After all of the paint is dry, give the entire car one coat of polyurethane gloss. Let it dry for at least 2 hours.
Step 8. Give the car a light sanding with 150 grit sandpaper.
Step 9. After the first coat is dry, give the entire car a second coat of polyurethane gloss. Let it dry for at least 2 hours.
Step 10. Give the car a light sanding with 150 grit sandpaper.
Step 11. After the second coat is dry, give the entire car a third coat of polyurethane gloss. Let it dry overnight.
Step 12. After the gloss is dry, place the sticker on the front like a real steak sauce bottle.
Step 13. Attach the wheels to the axles and then glue the axles to the axle holes. Let the glue dry.
Step 14. Add weights and/or graphite to the car. (optional)
Step 15. Race your car when it is dry.
Subscribe to:
Posts (Atom)