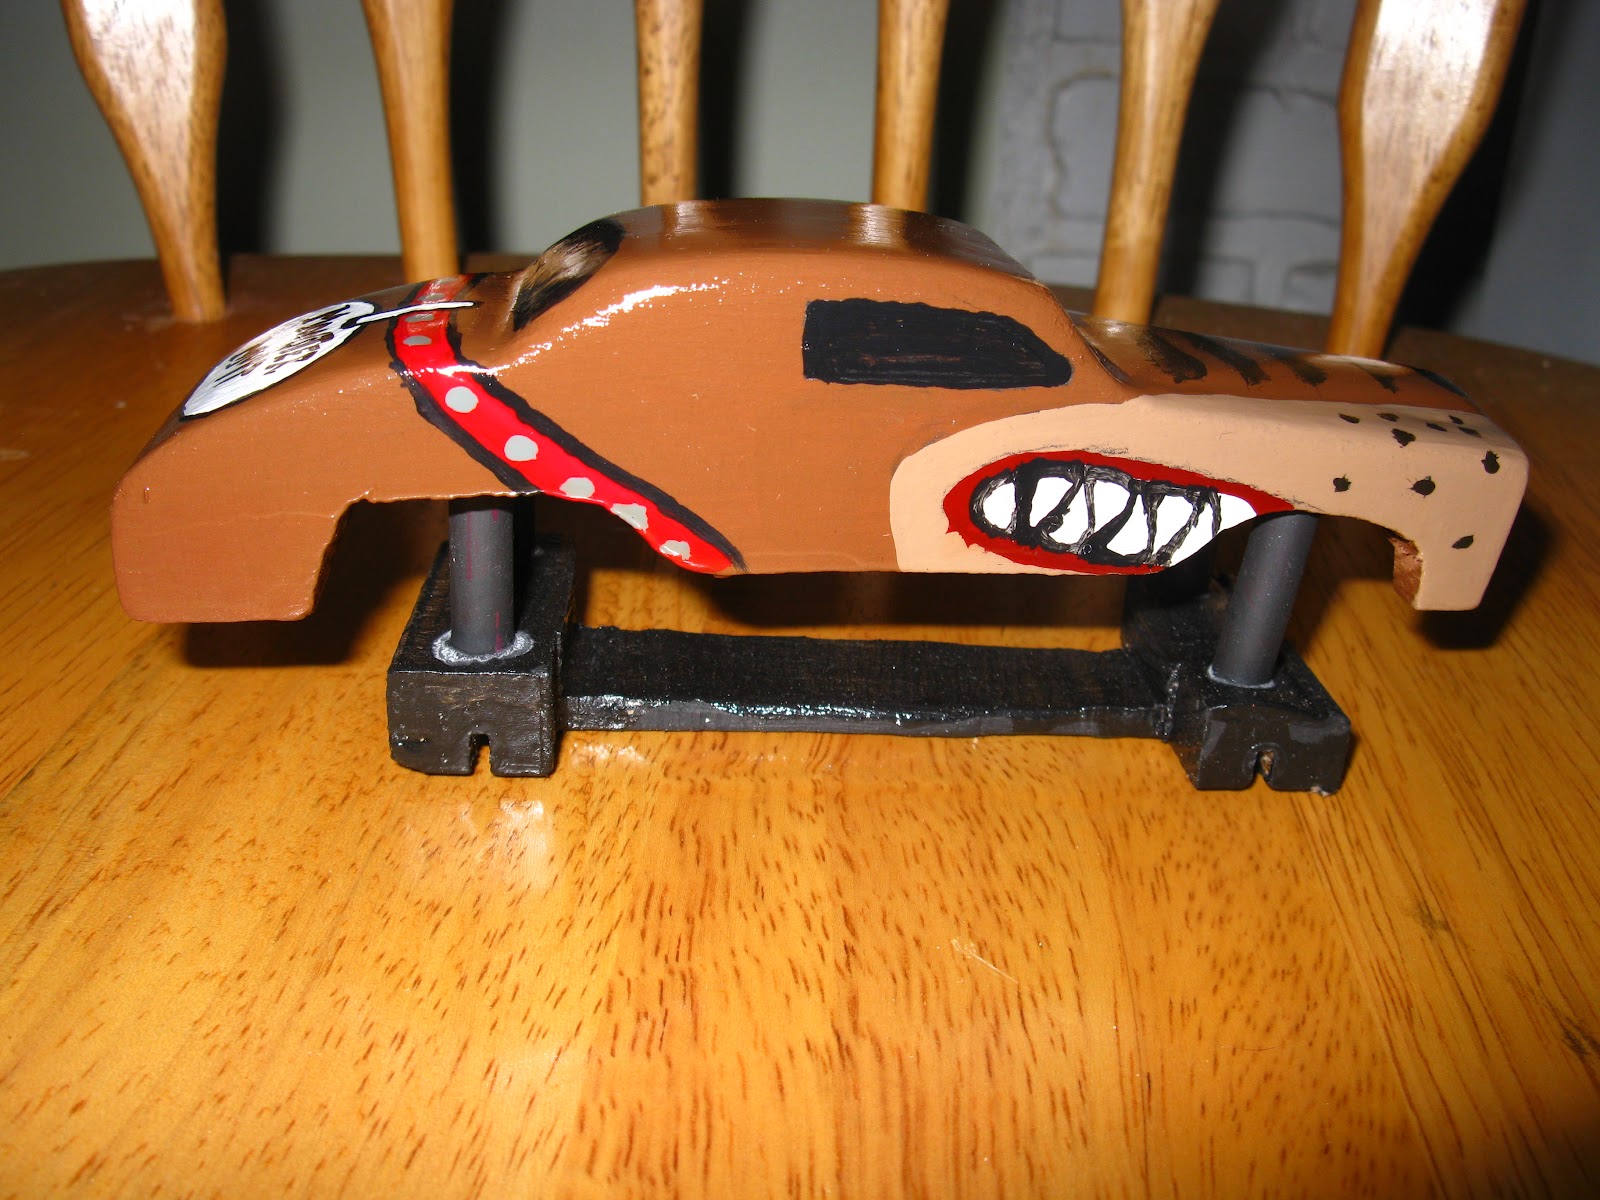
Here is Monster Mutt before we added wheels, a tongue, and ears.
The "lift" look was achieved by pencils cut to size.
Monster Mutt won 1st for design.
What you need:
1 standard pinewood derby kit
Dark brown felt
Light brown paint
White paint
Dark brown paint
Black paint
Red paint
Wood polyurethane gloss
60 grit sand paper
150 grit sandpaper
Saw of some kind
2 pencils
A thin block of wood, the same size as the derby car, in area
Super glue or hot glue gun
Painters tape (optional)
Weights (optional)
Drill (optional)
Graphite (optional)
How I made it:
Step 1. Cut the block to the proper dimensions for a basic shape of the truck, rounding the top.
Step 2. Carefully cut off the bottom part of the car, making fenders while having 2 pieces of wood. Save the spare piece.
Step 3. Sand the entire car with 60-grit sandpaper.
Step 4.Take the spare piece of wood and cut it to the dimensions of the bottom frame, as shown in the picture.
Step 5. Cut the pencils into 4 separate pieces, all the same length, so it would make the car higher but below the height restriction, as shown in the picture.
Step 6. Hot glue or super glue the pencils as shown in the picture to connect the 2 frames, as the "lift" of this truck.
Step 7. After all of the glue is dry, paint the top with a dark brown base, and paint the bottom with a black base. Repeat this step after the paint dries.
Step 8. Give the car a light sanding with 150 grit sandpaper.
Step 9. After the second coat is dry, paint on all of the designs. At this point, it would help to have a picture of Monster Mutt.
Step 10. After the details are painted and do not need another coat, paint a thin coat of polyurethane gloss on the entire car.
Step 11. After the first coat is dry, give the entire car a second coat of polyurethane gloss. Let it dry overnight.
Step 12. After the gloss is dry, cut the felt into ears and glue them on the car, as shown in the picture.
Step 13. Attach the wheels to the axles and then glue the axles to the axle holes. Let the glue dry.
Step 14. Add weights and/or graphite to the car. (optional)
Step 15. Cut a small piece of wood, paint it red, and glue it where the tongue goes.
Step 16. Race your car when it is dry.
Thursday, February 9, 2012
Wednesday, November 16, 2011
2010 Milky Way Car
2010 Milky Way Car
Awards:

What you need:
1 standard pinewood derby kit
Brown paint
White paint
Green Paint (or if you're not the painting type, a Milky Way label should have the same effect)
Wood polyurethane gloss
60 grit sand paper
150 grit sandpaper
Saw of some kind
Glue (for axles)
Weights (optional)
Drill (optional)
Graphite (optional)
How I made it:

Step 1. Cut off the four triangles in the corners of your block, as viewed from the side, as this diagram illustrates.
Step 2. Give a good sanding with 60 grit sandpaper all over the car. Finish off with a light 150-grit sanding.
Step 3. After you have sanded it, give the car 1 coat of brown paint on the whole car.
Step 4. Give the car a second coat of paint when the first coat dries, painting the same area you did in step 3.
Step 5. After all of the paint is dry, give the entire car one coat of polyurethane gloss. Let it dry for at least 2 hours.
Step 6. Give the car a light sanding with 150 grit sandpaper.
Step 7. After the first coat is dry, give the entire car a second coat of polyurethane gloss. Let it dry for at least 2 hours.
Step 8. Give the car a light sanding with 150 grit sandpaper.
Step 9. After the second coat is dry, give the entire car a third coat of polyurethane gloss. Let it dry overnight.
Step 10. After the gloss is dry, place or paint the Milky Way label on the front like a real Milky Way Bar.
Step 11. Attach the wheels to the axles and then glue the axles to the axle holes. Let the glue dry.
Step 12. Add weights and/or graphite to the car. (optional)
Step 13. Race your car when it is dry.
Awards:
2nd For Speed
Top left: This car is very aerodynamic thanks to it's "wedge" shape, which is based off an actual candy bar.
Bottom left: We're surprised it's classic candy bar design didn't win us anything in the design department.
What you need:
1 standard pinewood derby kit
Brown paint
White paint
Green Paint (or if you're not the painting type, a Milky Way label should have the same effect)
Wood polyurethane gloss
60 grit sand paper
150 grit sandpaper
Saw of some kind
Glue (for axles)
Weights (optional)
Drill (optional)
Graphite (optional)
How I made it:
Step 1. Cut off the four triangles in the corners of your block, as viewed from the side, as this diagram illustrates.
Step 2. Give a good sanding with 60 grit sandpaper all over the car. Finish off with a light 150-grit sanding.
Step 3. After you have sanded it, give the car 1 coat of brown paint on the whole car.
Step 4. Give the car a second coat of paint when the first coat dries, painting the same area you did in step 3.
Step 5. After all of the paint is dry, give the entire car one coat of polyurethane gloss. Let it dry for at least 2 hours.
Step 6. Give the car a light sanding with 150 grit sandpaper.
Step 7. After the first coat is dry, give the entire car a second coat of polyurethane gloss. Let it dry for at least 2 hours.
Step 8. Give the car a light sanding with 150 grit sandpaper.
Step 9. After the second coat is dry, give the entire car a third coat of polyurethane gloss. Let it dry overnight.
Step 10. After the gloss is dry, place or paint the Milky Way label on the front like a real Milky Way Bar.
Step 11. Attach the wheels to the axles and then glue the axles to the axle holes. Let the glue dry.
Step 12. Add weights and/or graphite to the car. (optional)
Step 13. Race your car when it is dry.
Subscribe to:
Posts (Atom)